When you spoof your location, iFlowGo overrides your iPhone’s GPS signal. For short distances (under 15 km), this works seamlessly on its own — the GPS override is enough to fool Pokémon GO.
However, iOS doesn’t rely on GPS alone. It also uses Wi-Fi-based positioning: your iPhone periodically queries Apple’s location servers (like gs-loc.apple.com) by scanning nearby Wi-Fi networks and cross-referencing them against Apple’s global database. This gives iOS a second, independent estimate of where you actually are.
When you teleport over long distances — say, from Singapore to New York — the GPS coordinate iFlowGo injects and the Wi-Fi-derived position Apple returns are wildly different. iOS detects this conflict and Pokémon GO ends up receiving an unreliable or incorrect location.
This is where NextDNS comes in. By blocking the Apple location service domains at the DNS level, you prevent iOS from querying Apple’s Wi-Fi positioning database entirely. With that second data source cut off, iOS has no choice but to trust the GPS coordinate iFlowGo provides — no matter how far you teleport.
In short: NextDNS doesn’t change your location — it removes the system that would otherwise contradict it.
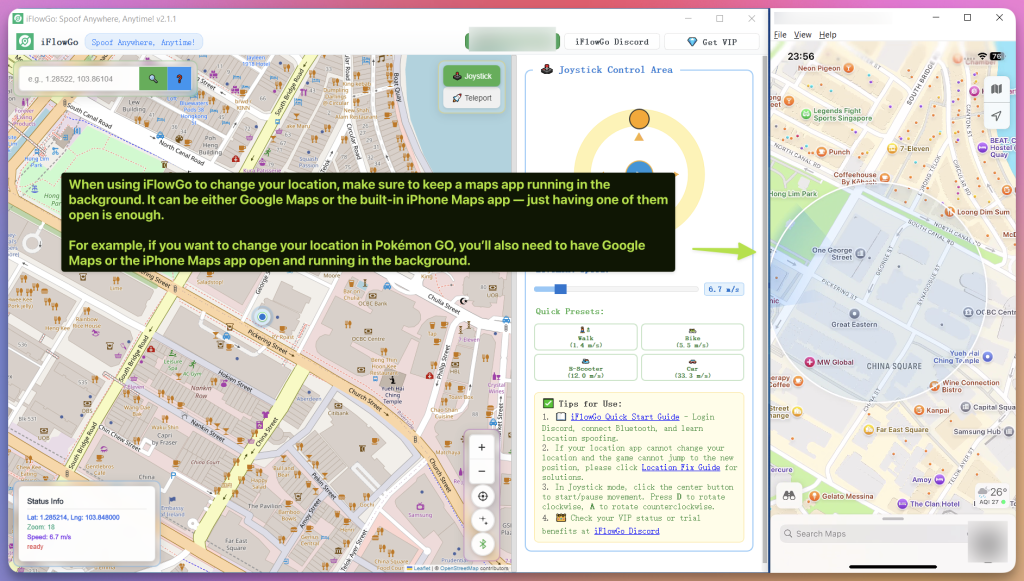
If you’re only spoofing short distances (under 15 km), iFlowGo will usually work right away without any extra setup. ![]()
However, if you want to teleport longer distances (e.g., jumping across countries) or notice that your avatar randomly flies back to your real home location after a few minutes, you must configure NextDNS on your iPhone. This step blocks Apple’s background location correction servers, ensuring your spoofed location stays stable in Pokémon GO.
 CRITICAL REQUIREMENT FOR STABILITY
IMPORTANT: For this setup to work and to prevent your location from rubberbanding back home, you MUST keep Cellular Data COMPLETELY TURNED OFF and rely entirely on a stable Wi-Fi connection throughout your entire session.
Part 1: Basic NextDNS Configuration
Step 1: Download and Install the NextDNS App
-
Download the App
-
Open the App Store
-
Search for “NextDNS”
-
Tap Install
-
-
Initial Setup
-
Open the NextDNS app
-
Tap “Get Started”
-
Create or log in to your NextDNS account
-
Step 2: Configure NextDNS in Your Browser
1. Visit the Website
- Go to: https://my.nextdns.io/
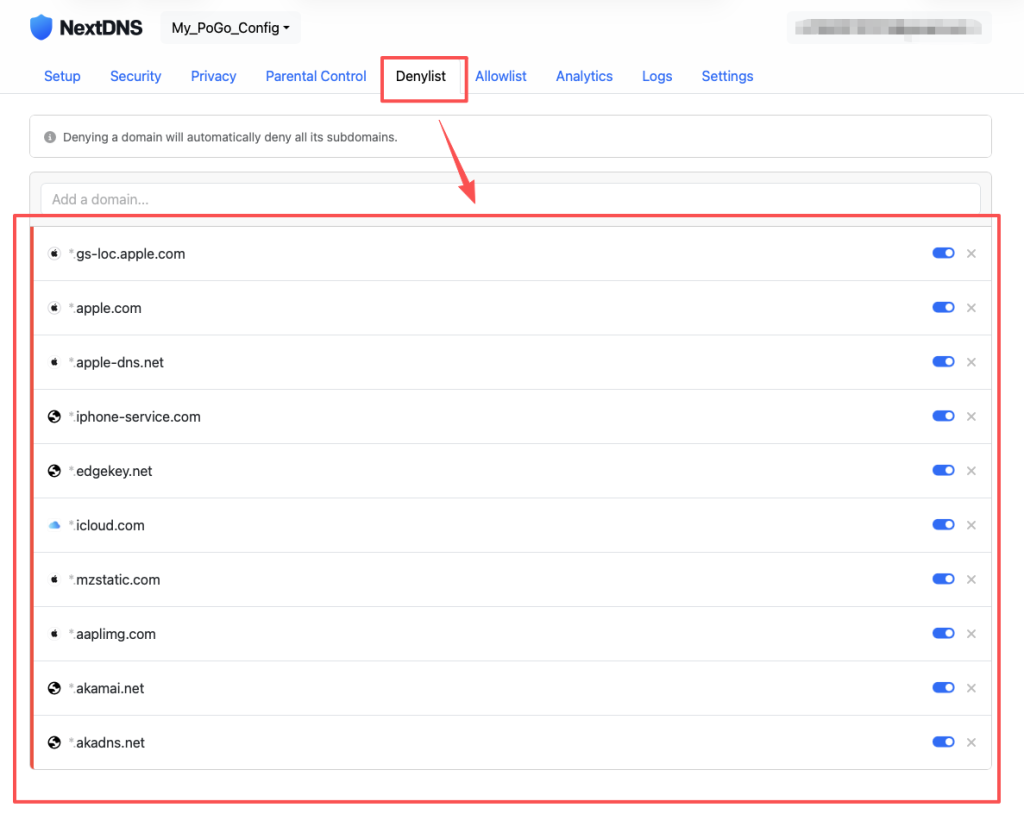
2. Denylist Domains
-
Under Denylist, add the following Apple domains:
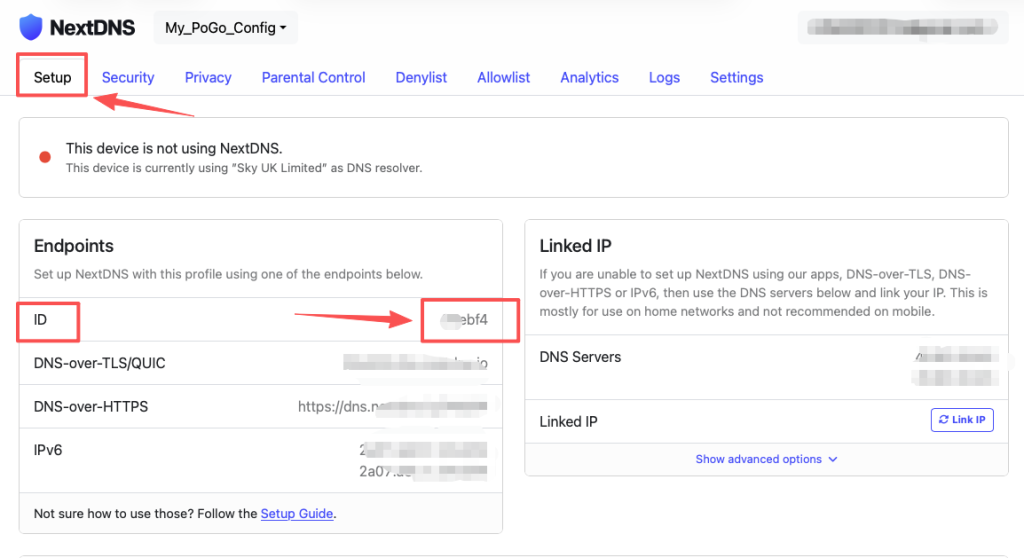
3. Get Your Configuration ID
-
Navigate to the “Setup” page
-
Copy your Configuration ID (e.g.,
9c1c6f)
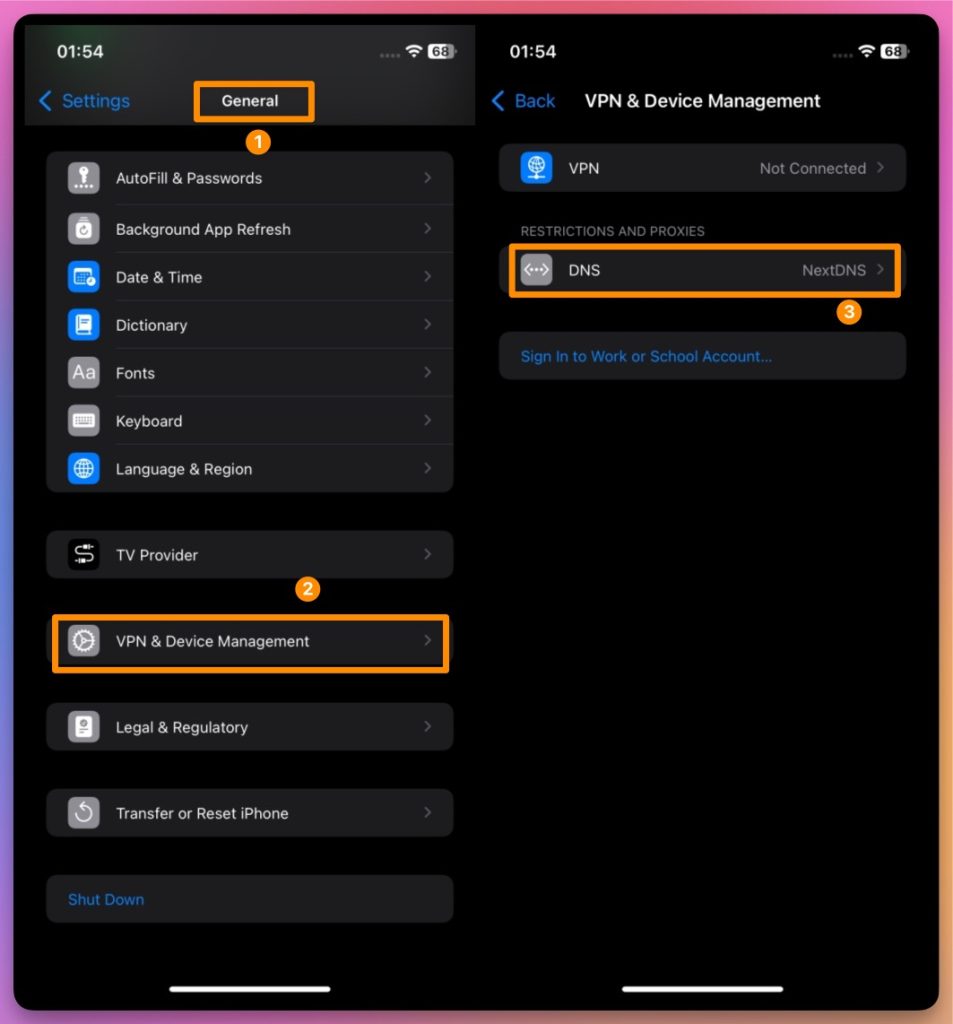
Step 3: Configure DNS on Your iPhone
1. Enable DNS
-
Open Settings on your iPhone
-
Go to General > VPN & Device Management > DNS
-
Select NextDNS
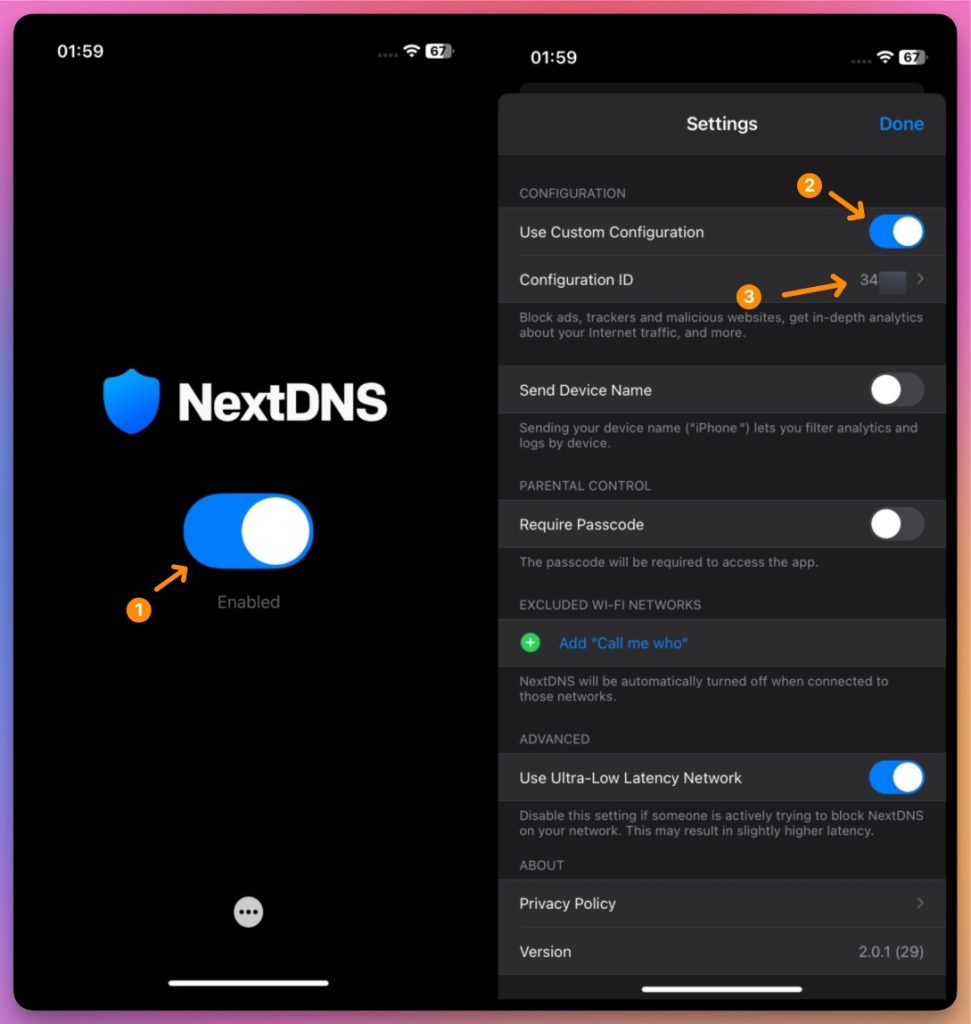
2. Apply Settings
-
Open the NextDNS app
-
Enable NextDNS
-
Paste your Configuration ID
Part 2: Advanced Wi-Fi Spoofing Configuration
Step 4: Set Up Virtual Location
1. Simulate the Target Location
-
Launch your virtual location tool
-
Set your desired iOS location
-
Confirm the map displays the correct coordinates
2. Network Connection Test
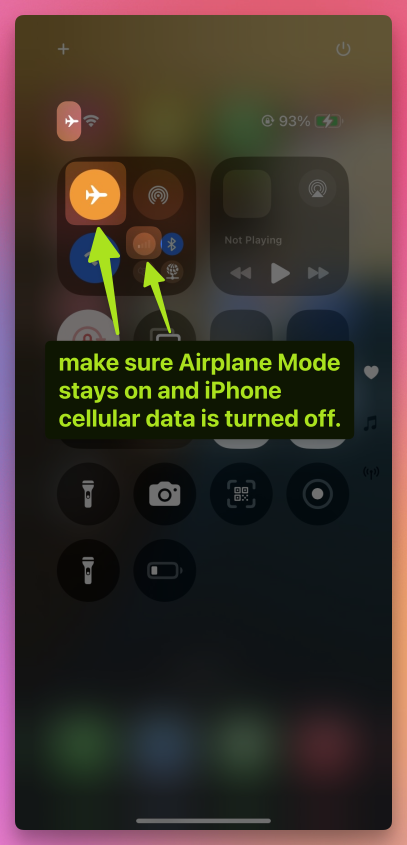
- make sure Airplane Mode stays on and iPhone cellular data is turned off.
-
Make sure Wi-Fi and NextDNS are active
-
Test to ensure internet connectivity is working
3. Advanced Troubleshooting: Reset Location Services(
(Important — follow these steps if you can’t change your location)
- make sure Airplane Mode stays on and iPhone cellular data is turned off.
1. Open Settings > Privacy & Security > Location Services
2. Turn off Location Services
3. Turn off Wi-Fi
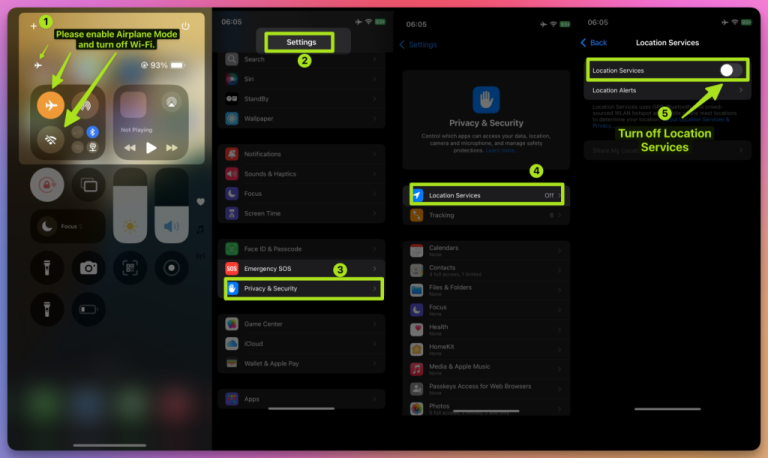
4. Wait 10 seconds
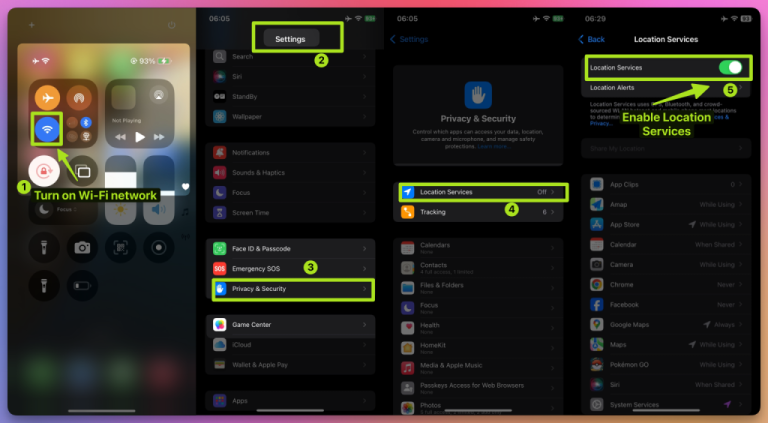
5. Turn on Wi-Fi network
6. Go back to Privacy & Security > Location Services, enable Location Services
Part 3: Game Launch & Final Setup
Step 5: Launch the Game App
-
Start Pokémon GO
-
Ensure all setup steps are completed
-
Open Pokémon GO
-
Log into your account
-
-
Check Your Location
-
Make sure the map loads properly
-
Your avatar should appear at the virtual location you set
-
Try walking or moving around within the spoofed area
-
 Troubleshooting Tips
- During the spoofing process, please keep Airplane Mode enabled and cellular data turned off on your iPhone.
1. NextDNS Not Working
-
Confirm DNS is enabled in network settings
-
Double-check the Configuration ID
-
Make sure Transport Layer Encryption is turned on
2. Location Still Not Working
-
Verify that Apple domains are added to the Denylist
-
Ensure network settings are correctly applied
-
Check that your virtual location tool is running
3. Game Not Updating Location
-
Both network and location settings must be stable
-
Log out and back into Pokémon GO
-
Check if the Wi-Fi settings are correct
 Final Configuration Checklist
-
During the spoofing process, please keep Airplane Mode enabled and cellular data turned off on your iPhone.
-
NextDNS app installed and configured
-
Configuration ID copied and pasted correctly
-
Apple domains added to Denylist
-
NextDNS enabled on iOS
-
Stable Wi-Fi connection
-
Pokémon GO avatar appears at correct location
![]() Setup Complete!
Setup Complete!
Enjoy your game and happy spoofing with accurate location settings!